FAQs
TDIDI FAQS...and other Acronyms
Okay maybe TDIDI FAQs are all the acronyms we got, at least for this page. We’ve fielded loads of disc dyeing question from the TDIDI Army over the past couple of years. Below is a compilation of the ones that seem to come up most often. Just click any of the questions listed below to activate the drop down for your answers. Don’t see the question you’re looking to have answered below? Fill out our FAQs Form on the bottom, we’ll start shaking up the Magic 8-ball and get back at you with the answers in a jiff! Remember, knowledge isn’t power. Applied knowledge is power. You’ve got the answers, now go and Do It!
Frequently Asked Questions
Click on any of the questions below to open the drop down with the answers you're looking for.
We dye commissioned projects at TDIDI each its’ own individual creation made for its’ new owner. Some take a day or two to complete, some a week. It all depends on what exactly it is you’re looking to have done to the disc to make it all your own. Visit our Custom Disc Dye Order Form to tell us all about the custom you’d like created and we’ll have a mock up of your stencil and quote ready in no time flat. All that said, most TDIDI custom disc dyes range from $25 – $50 before plastic and shipping.
Ideally we like to turn orders over within two weeks. That said, we’re not a production factory and orders can stack up in times of high demand pushing turn around times out as far as a month. Only one way to find out where we’re at right now, fill out our Custom Disc Dye Order Form and get the process started!
Not unlike with our custom disc dyes, every custom stamp design is different. It all depends on what exactly it is you’re looking for in a custom stamp. Visit our Custom Stamp Order Form to tell us all about the stamp you’d like created and we’ll have a quote ready in no time flat. All that said, most TDIDI custom stamp designs range from $25 – $50 unless also being purchase with a disc.
In short, you tell us all about the stamp that’s in your mind’s eye and send us a few images you might want incorporated into the design then we take it from there. We’ll work up a couple of preliminary ideas and a quote based on the complexity of your design, then move forward with creating your stamp after approval.
There’s a couple of things I do to help with bubbles in the lotion bed. First, I’ve started making the lotion beds a few hours in advance of using them. Every once in a while I pick it up a little and drop it back down on the counter. The little smack helps bring bubbles to the top and pop them as well. What doesn’t pop I try to take care of with the poker. Then 20-30 minutes later I circle back and repeat the process. By the time I’m ready to use it the large majority of the bubbles are out. If you have a little foot heater, setting the bed in front of it will also help bring the bubbles to the top while it sits. Another option is to quickly run a small torch over the top. You just want to make sure you don’t let it get too hot to the point where the lotion gets too soupy. The other thing I’ll say that has been helping, is when you squirt the lotion into the plate (or whatever you’re using) do it gently and not all straight into the center. Squeezing too hard forces air through the bottle with the lotion, and squirting it all into the same spot seem to trap air that does come through deep down. I squirt it slowly in a spiral from the center out. The other thing that can introduce air bubbles into the bed is when you’re raking the design. Slide the McPokerton, or whatever you’re using, into the bed slowly and intentionally. Drag it through slowly, then pull it back out slowly. This might all sound a little ridiculous, but I’ve noticed most of my air bubbles now are right on the rake line because I was too rough with it.
I don’t really have an exact measurement for iDye or ProChem to acetone. If I were forced to guess though I would say ¼ tsp to about 3 oz of acetone. Your best bet is always to test your mix out and see if you like the color or shade. I keep a white disc that I use occasionally, it has
hundreds of test brush marks on it at this point. If you want it darker add a little more dye, lighter add a little more acetone. Equally as important is making sure all of the powder is fully mixed and dissolved into the acetone. Sometimes just shaking the crap out of it doesn’t get the job
done and you’ll see particulate still in the mix. I usually bring in a little heat at this point spinning the bottle over a candle for a minute. Be very careful if you try this the acetone is SUPER flammable. If there’s even a little on the outside of the bottle it will go up in flames, so wipe it down good. Also, while heating it pressure will build up inside as the acetone starts to vaporize a little. When you reopen the bottle it will hiss and spit from the pressure. I reopen it with a paper towel around the cap to curb the mess.
The lotion mix I use is still an evolving work in progress, and I use different ratios at different times for different effects. That said, the base that I’m typically working from is roughly ¼ tsp of ProChem (or iDye), mixed with just enough acetone (or same color Worm Dip) to swish it around and start dissolving it, then about 3-4 oz of cocoa butter. It’s crucially important to stir, mix, and shake it all up until the dye is evenly distributed throughout the lotion.
In the glue mix I use it is typically about 1 oz of Floetrol, 3 oz of white glue, about ¼ tsp of ProChem or iDye, and a splash of acetone. I put the Floetrol in the cup first, then drop in the powdered dye. Then comes a dash of acetone, just enough to wet all the dye. Then I mix that up all real good, then add the white glue and mix it a whole bunch more. Just like with the Lotion/Dye mix, stir shake and mix it long enough for the dye to be evenly distributed throughout the glue. This mix transfers well to the disc in different mediums, but best when I use in a white glue bed and with a little heat on it while it sits.
Pretty simple. One whole pack of black iDye Poly, a ¼ tsp scoop of brown iDye Poly, and large mason jar of water. I first heated the water up to just before boiling, then added the dyes and mixed it up real good until all of the particulate was fully dissolved. Then the dye mix is poured into the electric skillet and kept between 125 – 150 degrees. The dye mix can be kept and reused over and over again. Just add a little more water or dye over time as needed, and stir it up good again each time.
More often than not I set the disc in front of a little foot heater (the kind that sits under your desk) overnight. I’ve used heat lamps and heat mats as well, but I just like the foot heater a little better. It’s amazing the difference adding heat to the bed can help with color saturation. I use it for almost every glue bed I make, and some lotion beds. Be careful, adding heat can be a tricky balance with lotion beds, too much can liquify the bed and compromise the integrity of the design.
This really depends on a couple of different factors. Mainly what type of plastic are you dyeing, and what type of dye or dye mix are you using. A very general answer is about 8-12 hours for Star-like plastics and 24-48 hours for Champion-like plastics. That’s relatively consistent across most dyeing methods. One thing that can shorten the time is using straight dye in the bed (like for a lotion swirl or time warp) instead of a dye mix. The straight dye will typically penetrate the plastic quicker than when it’s mixed with other mediums. Heat can also help reduce the time in the bed, or improve the color saturation over the same time. Just be careful not to overdo it and liquify your lotion bed (glue beds usually hold up to the heat no problem) with too much heat.
The Fiebing’s is much different than the other dyes because its not a Poly dye and wasn’t really intended for plastics. That said, when I still use it (which I’m starting to move over to hot dips pretty exclusively for the black now, much cleaner and just as black) I let the disc sit for a few days after putting it on. The dye dries in a couple of hours and cures in a few days. After it has fully cured you should be set. Just remember that if you’re bringing more dye to the disc after, any acetone in the mix will reactivate the black and smear/smudge it again. This is where it all started for us and helped created so many awesome discs, but I doubt I’ll use Fiebing’s again unless I’m actually dyeing some leather.
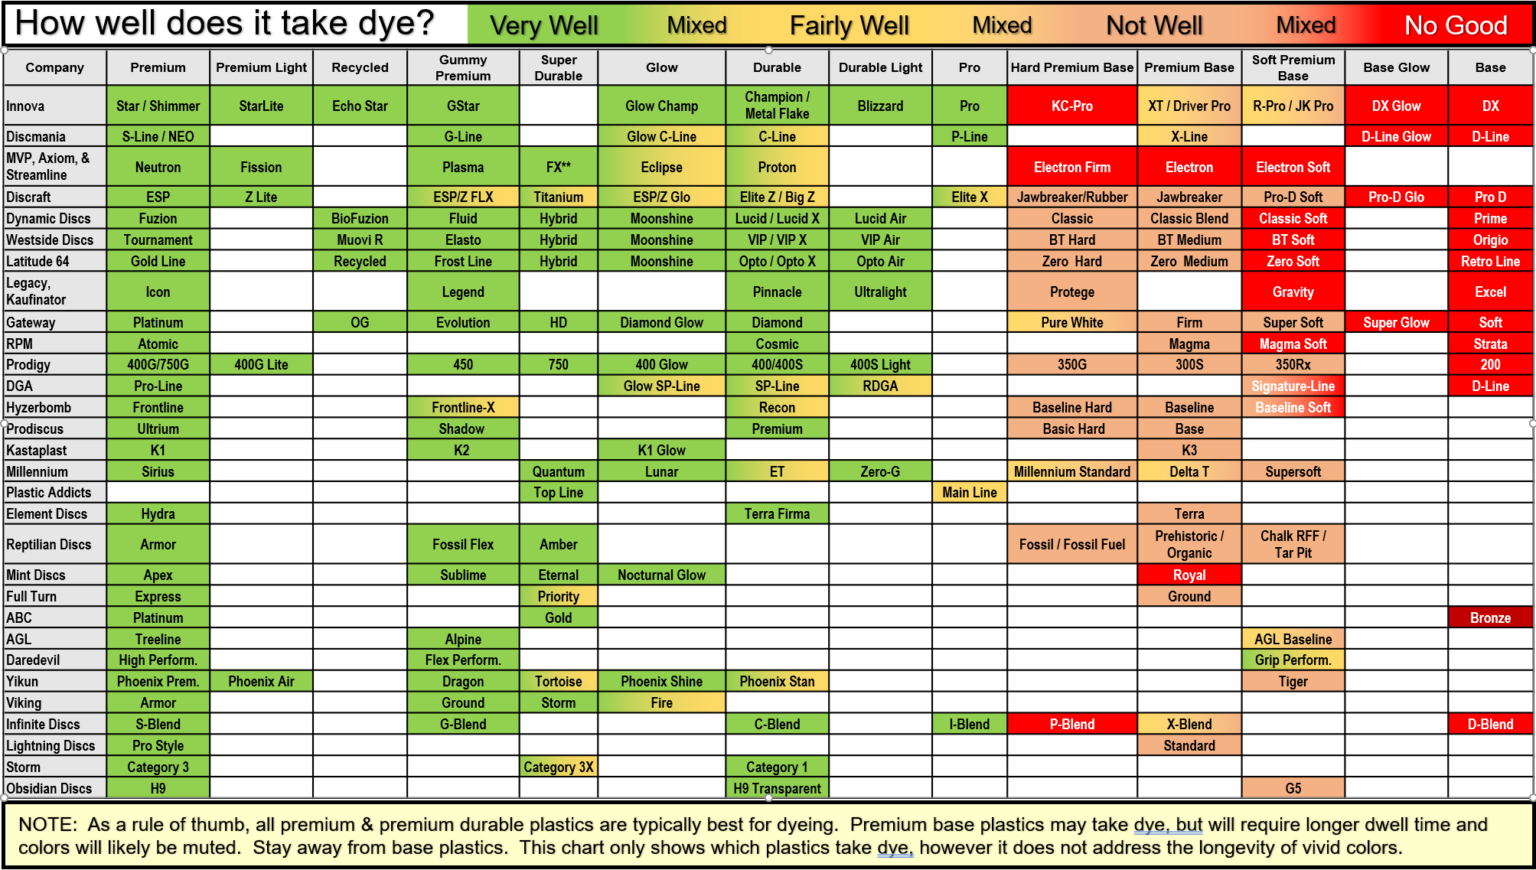
Dye Acceptability Chart
The most popular question we get has to do with the Dye Acceptability of different plastics. This chart that was put together by Mr. Scott Case is the best and most comprehensive breakdown I’ve seen yet. He was awesome enough to give us permission to display it here on our site to help guide all of us through our pressing plastic decisions.
Chart courtesy of Mr. Scott Case
Still have questions?
Don’t worry if you’re still left with questions, we’re here to help. Fill out the form on the right detailing your question and we’ll get back to you with the best answers we got. Yours could just be the next question listed here on our FAQs page helping other new disc dyers find their way down through the wormhole.

